Tuesday, December 16, 2014

Tag, You're It!

Below are a couple more projects I completed for the Art Anthology/Stampendous Blog Hop we had last week.

Tags Step 1

While I was creating my I’ll Fly Away journal page for an Art Anthology post, I also pulled a few tags using the paint that was leftover on my Stampendous Creative Palette.  I got three really good pulls off of it and still cleaned quite a bit off the palette when I finished.

Dream Tag Step 1

Using a couple of the stamps from the Stampendous Grunge stamp set, I created a background on one of the tags.

Dream Tag Step 2

Next, I stamped the Stampendous Moray Dahlia stamp onto a piece of cardstock using India Ink.

Dream Tag Step 3

I cut the flower out and colored it with Art Anthology Lemon Tart, Mardi Gras, and Orchid Velvet.

Dream Tag Step 4

Then I stamped the leaf stem that came with the stamp set, colored it with art Anthology Leaf Sorbet and Kona Velvet.

Then I once again got so involved I forgot to show this next step.  I took a clear embossing pen and dabbed it all over the tag.  I then sprinkled Crystal Embossing Powder from theStampendous White Encrusted Jewel Kit over the tag, tapped off the excess, and heat set.

Dream Tag Complete

I followed with some stenciling using our Beehive stencil and a mixture of our soon to be released smooth texture paste (WOOHOO) and Art Anthology Mardi Gras Velvet.  I then stenciled DREAM using the Art Anthology Soliloquy stencil and a Micron Pen.  I then colored the words with Art Anthology Lemon Tart Velvet and the background with Plus Colorations and the Round Brush from our Tool Set.

I couldn’t just stop at once tag, so I created two more.

Play it Again Step 1 Play it Again Complete

This time I used the Stampendous Musical Motif stamp set and stamped out the keyboard onto cardstock. I cut it out and adhered it to the right side of my tag.  I whitened the keys with Cotton Velvet and darkened the frets with Art Anthology Tuxedo Velvet, followed up with a coat of Art Anthology Splashed Sorbet for sparkle.  I then added my quote and sprayed the cardstock with Juicy Colorations.

Sew Step 1

For the final tag, I used the houndstooth stamps from the Stampendous Dress Form stamp set and randomly stamped it over my tag.

Sew Step 2

Next, I stenciled a measuring tape using a Tim Holtz stencil and Lava Stone Effects (great texture!).  I also added some more interest with our Cracked stencil and Silver Metal Effects.

Sew Complete

Finally, I stamped the dress form onto cardstock using India Ink and cut it out.  I thought this tag would look great on one of the Christmas I will be sending out to a swap partner.
Until later....................
LiveWriter Signature

Thursday, December 11, 2014

I'll Fly Away

Hey everyone.  There is a blog hop going on over at Art Anthology (www.artanthology.com/blog) and Stampendous (http://stampendousblog.wordpress.com/).  Below is a journal page I created for the hop.  Hope you enjoy!

I started with page from my 5x7 watercolor journal.  I didn't remove it from its binding.

Fly Away Journal Step 1

I began by putting dabs of Art Anthology Desire, Tango, and Lemon Tart Velvet on a Stampendous Creative Palette and then brayered it until I liked the mixture.

Fly Away Journal Step 2

I layered my page over the Stampendous Creative Palette and ran my hands over it, making sure that I covered my entire page.

Fly Away Journal Step 3

Next I applied Art Anthology Wineberry Velvet and Evergreen Sorbet to Stamendous's Ranunculus Field stamp and stamped onto a sheet of white tissue paper.

At this point, I got so involved in what I was doing I forgot to take pictures, so I will describe what I did.  I took the circle template found in the Stampendous MIsh Mesh stamp set and stenciled Art Anthology Mint Julep Sorbet through it at the top of the page.  I then used the Round stamp from the same set and stamped over my page with India ink.  Next, I used the Diamond stamp from the Stampendous Wired set with Royal Velvet chalk ink and stamped over the page in random areas.  All this was toned down with Gesso.  I then took my stamped Ranunculus image done on the tissue paper and adhered it to the page using gel medium.  The tissue paper literally disappears, leaving the image.

Fly Away Journal Step 4

Next, I took a bunch of Art Anthology Butterfly Embedibles and covered them in Gesso.

Fly Away Journal Step 5

I then painted them in a rainbow of Art Anthology colors:  Fiesta, Wineberry, Lemon Tart, Orchid, Shamrock, Fiji, and Reef Velvets and Just Peachy and Viridian Sorbets.

Fly Away Journal Complete

All that was left was to assemble the page and type out my wording. I painted the edges of the page with Tuxedo Velvet to create a border.

Until later....................
LiveWriter Signature

Tuesday, December 9, 2014

BRRRRR It's Cold Outside

Hello everyone!   Here's a wintry tag I created for this month's Challenge over at Gauche Alchemy. I loved the colors and textures we were given and decided to make something as chilly looking as possible. To accomplish this I decided to stick with shades of blue.

It's Cold Outside Full

I started with an extra large manila tag and painted it with Art Anthology Baby Blue Eyes.  Then I stamped some text across the page using an old Stampers Anonymous stamp I had along with a postmark stamp I found. I then flicked white ink across the page. There is some reflection in the picture because the paint I used has glitter and mica in it, giving it a shimmery effect.

It's Cold Outside Middle

I found an appropriate wintry image in my stash and cut it out using an oval Sizzix die and then circled it with Stampendous Shaved Ice. Using Ice Blue Stickles, I added accents to the lady’s hat and stole.

It's Cold Outside Tag Top

I then used another Sizzix die to cut out snowflakes from some pretty shiny blue paper I had and adhered them randomly across the page. Next I glued down mica fragments from Stampendous’s Encrusted Jewels Technique Kit to the top of the tag.

If you would like to participate in this month's challenge, click http://www.gauchealchemy.com/2014/12/01/decembers-challenge-wintery-mix-mixed-media/.

Until later....................
LiveWriter Signature

Friday, November 7, 2014

Faces

Hello everyone! Today I have a 6×6 canvas for you. The Gauche Alchemy inspiration board for this month is just awesome what with the bright colors, metallic, and geometric shapes, OH MY!

Faces Canvas Bare 
I started with a 6×6 canvas and applied a layer of gesso to prime the surface and keep my paints and mists from soaking through. This is very important if you are going to work with canvas.

Faces Canvas 
Once the gesso was dry, I sprayed on layers of Art Anthology Glorious, Juicy, and Peacock Feathers Colorations and then pulled out my Art Anthology Evergreen Sorbet and Lemon Tart and Tango Velvets and got to painting. Once that was dry, I mixed up a little of Art Anthology Copper Metal Effects with some Studio 490 Translucent Modeling Paste and stenciled through TCW’s Mini Harlequin stencil. I then took some Studio 490 Black Embossing Paste and stenciled through Dylusion’s Small Triangle stencil in a couple of areas. Finally, I painted two faces I made using a push mold and PaperClay and glued them to the canvas using Glossy Accents.

Faces Canvas Side 
To finish off the piece, I stenciled all around the edges with Studio 490 Gold Embossing Paste and TCW’s Mini Hourglass Stencil.

If you are interested in participating in Gauche Alchemy’s November Challenge, just click here to enter:  http://www.gauchealchemy.com/scrapbooking-mixed-media-monthly-challenges-entries/

Until later………………………

LiveWriter Signature

Thursday, November 6, 2014

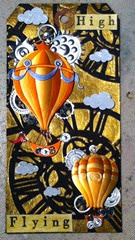
High Flying

I’m a member of Art for the Creative Mind swap group.  When a person dropped out of a swap without fulfilling their commitment, I volunteered to step in and take their place.  The theme was Hot Air Balloons.  I thought I had some 3D balloon stickers around and dug around until I found them.

High Flying Tag

I used Studio 490 gold embossing paste through a TCW stencil over a black tag.  Then, I painted a few UmWow clouds with white acrylic paint and Art Anthology Splashed Sorbet.  Voila!  A tag that I really like.  Hope the recipient likes it also.

Until later…….

LiveWriter Signature

Sunday, November 2, 2014

Like Night and Day–Art Anthology/Altered Pages Blog Swap

Today I wanted to share a journal page and an ATC I created using Art Anthology paints and Altered Pages stamps for the blog swap Art Anthology recently had with Altered Pages.

Moon for Journal Page Web Sun for Journal Page Web

I stamped the Moon, Stars, and Sun from Altered Pages Celestial Playground stamp set and colored them with Silver Metal Effects (moon), and Lemon Tart, Tango, and Desire Velvets (sun).  I then fussy-cut them out.

Journal Start

I started with an Art Anthology Journal and sprayed Juicy, Ink Spot, and Plus Colorations all over the page.

Page 2 Web

Next, I sprayed Ink Spot Colorations through our Doily Stencil in a couple of areas.

Page 3 Web

Next, i mixed Silver Metal Effects with Studio 490 Transparent Embossing Paste and added circles to the side of the page using the Bubbles Stencil.

Page 4 Web

I then stenciled some small dots using Black Stone Effects and the Dot Matrix Stencil.

Page 5a Web Page 5 Web

I then mixed Lemon Tart Velvet with Bone Stone Effects and applied this mix through the Dot Matrix Stencil in different areas.

Page 6 Web Page 7 Web

Since I wanted to add some some of our wonderful Embedibles to my page, I gesso'd some of the Butterflies and Birds and then painted the Birds with Silver Metal Effects and the Butterflies with Tango, Fifi, and Fiesta Velvets.

Page Complete Web

I then laid everything out on my page and added the wording.

Stamped Images Web

For the ATC I created, I stamped some of the images from Altered Pages Circus Time stamp set and colored the images with Lemon Tart and Desire Velvet.

Clown Face Web Circus Web

The clown is painted with Tango, Basil, and Lemon Tart Velvet and "Circus" is painted with Desire and Lemon Tart Velvet.

Stenciled Stars Web

For the background, I sprayed Salted Caramel over a piece of cardstock cut to size and then applied Tuxedo Velvet through our Twilight stencil using our Mini Blade Spatula.

Circus ATC Web

Finally, I put everything together and glued black fiber around the edges.

Until later…………..
LiveWrite Signature Line

Friday, October 31, 2014

ART – With Art Anthology and Altered Pages

Art Anthology and Altered Pages teamed up during October to offer some fantastic projects using their products.  Below is a mini canvas series I did for the blog swap.

AA-Altered Pages image

Step 1 Web

To get started, I covered three mini canvases with Art Anthology Gesso.

Step 2 Web

Next, I lightly misted a coat of Sandcastle Colorations.

Step 3 Web

I then gave two canvases a couple of coats of Lemon Tart and one canvas a couple of coats of Limeade Velvet.  It gave me a nice, grungy look which is what I was going for.

Step 4 Web

I stamped the A, R, and T stamps from Altered Pages Alphapalooza stamp set, then mixed up a little modeling paste with Desire Velvet and stenciled on some dots using the Dot Matrix Stencil.

Step 5 Web

I wanted to embellish the canvases a little, go I gesso'd some Hexagon and Triangle Embedibles then gave them a coat of Evergreen Sorbet.

Step 6 Web

Using a small paintbrush, I painted the "A" with Kona Velvet, the "R" with Desire Velvet, and the "T" with Shamrock Velvet.  I then added the hexagons and triangles to my canvases.

Step 7 Web

In order for the canvases to hang from each other, I snipped off pieces of an old necklace chain and attached them to my canvases using a mini stapler.  I then added a hanger to the back of the "A" canvas and hung it on my wall over my work table.

Hope you enjoyed this little mini tutorial. 
Until later……………….
LiveWriter Signature