Showing posts with label Nuance powders. Show all posts

Monday, February 13, 2017

Steampunk Queen for Lost Coast Designs

Good morning everyone!  Well, the Steampunk Queen of Hearts event is in full swing over at Lost Coast Portal to Creativity.  My make for the event is a coaster.

This was a LOT of fun to create.  I used the pointing queen from Alice and the Queen, Steampunk Planes, and the Gears Background stamps.

1)  Stamp the pointing queen from Alice and the Queen and Steampunk Planes with Versamark adn emboss with black EP.  Paint the queen with markers and watercolor pencils.  For the Steampunk plane, use blue Stickles for the balloon and brown marker for the plane.  Cut out and set to the side.
2)  Gesso the coaster blank.
3)  Spray with LSG Opal Sea Oats then using scarlet Nuance Powder and a water brush, create runs down your page.  Dry well.
4)  Stamp Gears Background with black ink then mist the entire background with LSG Sidewalk Chalk.
5)  Add the Queen and the plane to the coaster.  If you don't like the washed out looking gears (I didn't) go back over with a black gel pen.
6)  Add black Dresden trim to the edges.
7)  Scatter a few hearts around the coaster and add a couple of die cut crowns, adding Goldenrod Stickles to the top.
8)  Finally, print "Off with their head", outline with a black fine liner, and cut out.  Color with a water brush and a little scarlet Nuance Powder.

Don't forget to join in the fun at Lost Coast Portal to Creativity.  You'll have a chance to win Lost Coast Designs stamps!  Click HERE to enter your Steampunk Queen of Hearts.

Until later...............


 Marilyn

Sunday, August 28, 2016

Squared

Good morning everyone!  We are in Day 10 of the Hip 2 Be Square event at the Lost Coast Portal to Creativity.  Today I wanted to share with you how I made the "Squared" tag I created for the event.


Stamp Large and Small Squares Set 2 onto mixed media paper.  Color with a variety of markers.
Spritz tag with Lindy's sprays then mix up some modeling paste and Royal Blue Nuance Powder & Red Nuance Powder.  Use this to stencil through the Circle 9 & Border Circle stencils from Stencil Girl.  Cut a piece of lace from chipboard using a Sizzix die.  Emboss with silver EP then dab with gold paint.  Arrange everything on the tag and finish off with some fiber.

Hope you enjoyed viewing the tag as much as I did making it!

Don't forget to check out all the projects for the Hip 2 Be Square event.  There are even prizes!

Until later.................


Marilyn (Tarnished Rose)

Monday, August 1, 2016

Express Yourself with Lost Coast Designs

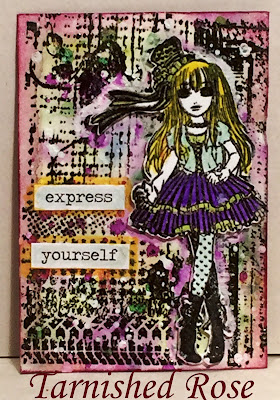
Good morning! It's the first Monday in August and that means it's time for a new Challenge on the Lost Coast Portal to Creativity! This month, the theme is Water Color Background. I'm on the team hosting this month's challenge and so have created and ATC to share.
I shook some Nuance Powder in Mauve, Grass Green, and Bright Yellow onto my ATC, then gave it a good spritz with water. I then stamped one of the ATC Grunge Set stamps onto the background and sprinkled on some clear EP. I spattered the background using LSG Prima Donna Purple and Bells of Ireland Green. I then watered down some white paint and spattered it on.

Stamp Mini Manga on a separate piece of mixed media card and set with clear EP. Paint the image with Silks in Snap Dragon, Key Lime, and Vintage Mint. The hair was painted with Paper Artsy Banana mixed with glazing medium to make it more transparent. Add the image to the card with foam to pop it off the page. Take some watered down white paint and paint an outline.

Lastly, smudge the edges of the ATC with Memories Royal Velvet Ink and add Chit Chat Words. Outline the words in the Banana paint then lightly cover with Silks Vintage Mint.

I'm entering this in the Colour Crazy Craft Challenge, Crafting with Friends, and Simply Papercraft,

Until later...............

Marilyn
Monday, July 25, 2016

Wings Mixed Media Card (PL sized card) & Lost Coast Designs

Good morning everyone and thank you for dropping by.  As promised, here's the step-out for my PL-sized mixed media card called Wings.


1)  Stamp Indinkera onto a piece of PL-sized (3-3/4 x 5-3/4) white cardboard.
2)  Stamp Winged Girl twice onto mixed media paper with Versafine ink.  Emboss one with LSG Midnight Copper EP and one with Cleopatra's Copper EP.  Cut out.
3)  Sprinkle Nuance powder in orange, bright yellow, and grace green on the background and mist with water.  Dry.
4)  Stencil translucent paste randomly through a circle stencil.
5)  Die cut some shapes using the Sizzix Crosshatch Frameworks die and paint with coral paint.  Spinkle on glitter while the paint is still wet.  Add to background.
6)  Punch out leaves and butterflies.  Spray leaves with LSG Bells of Ireland Green and butterflies with Cotton Candy Pink, A Bit O' Bubbly, and Frenchy's Pink Pouf mists.
7)  Place the Winged Girl you embossed with Midnight Copper EP on top of the other and offset slightly.  Glue together, then add mounting pads at the back to pop it up off the page and add to the card.
8)  Glue down the leaves in a circle around your image.  Add butterflies.
9)  Using soft matte gel, scatter glass glitter, micro beads, and glass beads across the card.  I used rose glass glitter, rust glass beads, and grass microbeads.
10)  Add TH Small Talk words.  Splatter with yellow and white pain and black gesso.

I'm entering this in the Classic Design Team Open Challenge BlogCrafty Calendar Challenge, and More Mixed Media Challenges.

Monday, July 18, 2016

For The Birds with Lost Cost Designs

Good morning everyone!  It's Day 1 of the New Stamp Release Showcase for Lost Coast Designs going on over on the Lost Coast Portal to Creativity and I've got several projects to share with you over the next few days.  Since today's focus on the Portal is Whimsical Birds, that's what I'll share along with step by step instructions.


1)  Using a #8 tag, stamp Bubbles background in black ink.  Sprinkle with Nuance powder and spritz.
2)  Using orange and yellow markers, fill in some of the circles then dry brush Gesso over the entire tag.  Just a little; you only want to tone down the colors, not cover them up.
3)  Stamp Mini Whimsical Birds 1 & 2 with black permanent ink.  Color with your choice of Lindy's Stamp Gang sprays.
4)  Using Sizzix Mixed Media 3 die, cut several bricks from chipboard.  Paint with Paper Artsy Cherry Red and emboss with Fired Brick Distress EP.  With a baby wipe, brush a little black paint over the bricks, then again using a baby wipe, add a little PA Cherry Red around the edges.
5)  Water down some red and black paint and flick across the tag.  Do the same with some Gesso.
6)  Glue down the bricks and add the birds on top.
7)  Water down some gray Nuance powder and add shadows around the birds and bricks, blending well.  Also go around the edges of the tag.
8)  Cut out alphas and numbers and paint with gray Nuance powder mixed with a little water.
9)  Cut a piece of red ribbon and roll it a mix of gray Nuance powder and water.

That's it!  Yep, this isn't a 15 minute tag, but it's worth all the work.  Hope you enjoy the Lost Coast Portal to Creativity's New Stamp Release Showcase.  Stay turned for more creativity!

Until later.................

Marilyn

Saturday, July 9, 2016

Merry Christmas! Christmas in July for LCD Portal to Creativity

Hi everyone!  I had an extra project I created for the Lost Cost Portal to Creativity.  I thought I'd share it with you today.


I'm not too great with cards, but I saw this Mary and Angels stamp on the Lost Coast Designs site and it was perfect for a greeting card.

I stamped Mary and Angels onto a piece of cardstock and trimmed it up, leaving a small border.  I painted their halos with Metallique Gold Rush, and their robes with various colors of Nuance powders.  I then mounted the cardstock onto a red card blank, ran a strip of Christmas washi tape across the bottom and added a 3-D sticker from K&Company.  Voila!  One completed card.

If you hurry, you can get in on the Lost Coast Portal to Creativity Christmas in July event.  It ends today, but you have a few more hours.  Click HERE to go to find the Linky and get entered!

I'm playing along with www.creativeartistemixedmedia.blogspot.com.au, Creative Corner Challenges, & Simply Papercraft.

Until later.................


Marilyn

Wednesday, June 22, 2016

Let's Dance!

Good morning everyone!  As promised earlier this month, here's the instructions on how I created my Let's Dance tag for Skelli-Fest that was held earlier this month on the Lost Coast Portal to Creativity blog.  


Lots of Lost Coast Designs goodness here!  Spiderweb Background, Dancing Skeletons, and Old Typewriter Alphabet.

So here we go..............

1.  Stamp Spiderwebs Background in white pigment ink and emboss with clear or white EP.
2.  Sprinkle on Nuance powders in red and gray and mist with water, moving the tag around until the colors blend and look like you want them to (totally subjective).
3.  Remove the EP using a hot iron and plain copy paper.  This make take several passes, making sure you keep moving to a clean spot on the paper (be careful not to get any on the iron).
4.  Stamp the Dancing Skeletons with black Versafine ink and then emboss with black EP.  
5.  Run a piece of black fiber through the hole.

It's a subtle looking design in the photo but in person the black embossing really stands out.  Hope you enjoyed!

Until later.........................


Marilyn

Sunday, June 12, 2016

Spirit Bird - Skelli-Fest at Lost Coast Portal to Creativity

Good morning everyone.  Skelli-Fest over at the Lost Coast Portal to Creativity continues with Day 9, my day!  Don't forget to get your link added for a chance to win a $20 gift certificate to Lost Coast Designs or Carmen's Veranda!


1)  Stamp Bird Bones & Spirit onto a piece of cardstock and cut out.
2)  Color the bones with White Dylusions and the darker areas with Gray Nuance powder mixed with water.  Color the branch with LSG Sandra Dee Sepia.
3)  Stencil the background by mixing Red Nuance powder with modeling paste and Colorbox's Wave stencil.
4)  Randomly stamp just the text part of Dream over the tag.
5)  Mix Bright Yellow Nuance with some water & Gray Nuance in water.  Keep separated.  Randomly paint parts of the white area with both the yellow and gray Nuance.  Once dry, use a water brush to blend them together as well as pull some of the color out of the stenciled areas.
6)  Take a small piece of the colored modeling paste and use it for an eye.  Cover with Glossy Accents.
7)  Pop up the bird with foam squares and place slightly below the midpoint.  Glue down the Spirit image at the top.
8)  Outline Spirit with a black watercolor pencil and then smudge it with a waterbrush.
9)  Use soft gel medium to scatter black glass glitter across the tag.
10)  Outline the tag using some of the Gray Nuance powder mixed with water.

I love the way the bird seems to hover over the background.  This is a great tag to create, though it will take a bit to get it all done.  Hope you enjoyed!

I'm entering this in Dark 'n' Daring Challenges & Dream In Darkness

Until later....................


Marilyn

Thursday, June 9, 2016

Skelli-Fest at Lost Coast Portal to Creativity

Good morning everyone!  Lost Coast Portal to Creativity is holding it's 2nd Annual Skelli-Fest!  Everyone is invited to enter their skull or skeleton-themed project for a chance to win a $20 gift certificate to spent at either Carmen's Veranda or Lost Coast Designs.  You will need to visit Day 1 of the Skelli-Fest to enter your link.

Today is Day 6 of the festival and it's my day to show off.  I have a tag I created using some great stamps designs by Lost Coast Designs.  Stay tuned later this month to see the step-by-step.


I'm linking this to the Dark and Daring Challenge and the Dream in Darkness Challenge.

Until later................

Monday, June 6, 2016

Manga Dream

Good morning everyone!  The challenge this month over on the Lost Coast Challenge blog is Use Something See-through.  So, for my challenge piece, I used acetate.

Don't we all just have tons of this stuff laying around from old packaging?  I know I do.  So, in order to be a better person and recycle, I decided to use a piece for this ATC.


1)  Stamp you image from the Mini Manga Set with Stazon ink onto a piece of acetate and trim to fit.  Set aside for now.
2)  Stamp your background using one of the Grunge ATC Set backgrounds in Cocoa pigment ink.  Heat set.
3)  Sprinkle on several colors of Nuance powder, spritz with water, and dry.
4)  Take you Mini Manga image and paint the BACK with Metallique Steampunk Copper and Gold Rush, and Paper Artsy London Bus.  Dry.
5)  Outline your ATC with a white pen, also outline a view of the diamonds.
6)  Glue on your acetate with Glossy Accents.
7)  Stamp "dream" using the Old Typewriter Alphabet set and black Versafine ink.
8)  Add a few silver stars (I die cut mine from chipboard using an old Sizzix die).

Done!

Until later..................


Marilyn